# Going Serverless with Google Firebase Functions
RELE.AI (opens new window) lets you leverage WhatsApp as a gateway to your enterprise systems and business processes intuitively. However, today, many enterprises decided to go serverless (opens new window). Serverless is an approach that uses managed infrastructure by cloud vendors to increase developers' productivity. One example will be Google Firebase Functions (opens new window), a solution that is connected natively to Firebase products.
# What are we going to build
To demonstrate RELE.AI simply, we will connect an example ToDo application with WhatsApp using the RELE.AI CLI (opens new window) and Google Firebase Functions (opens new window).
The ToDo application will have the following workflows automated using RELE.AI (opens new window):
/create-task- Create a new task/summary- Get a summary of all the open tasks/get-task- Get a specific task/delete-task- Delete an open task
We will use JSONPlaceholder (opens new window) /todo resource as our back-end service for this project.
USE A TEMPLATE
This tutorial comes with a GitHub template (opens new window) that you can use!
Run the following command to init a project from a serverless template:
rb create serverless -t rele-ai/firebase-functions-integration-template#main
This tip assumes you're already authenicated with the Firebase CLI and Firestore is already initiated in your project.
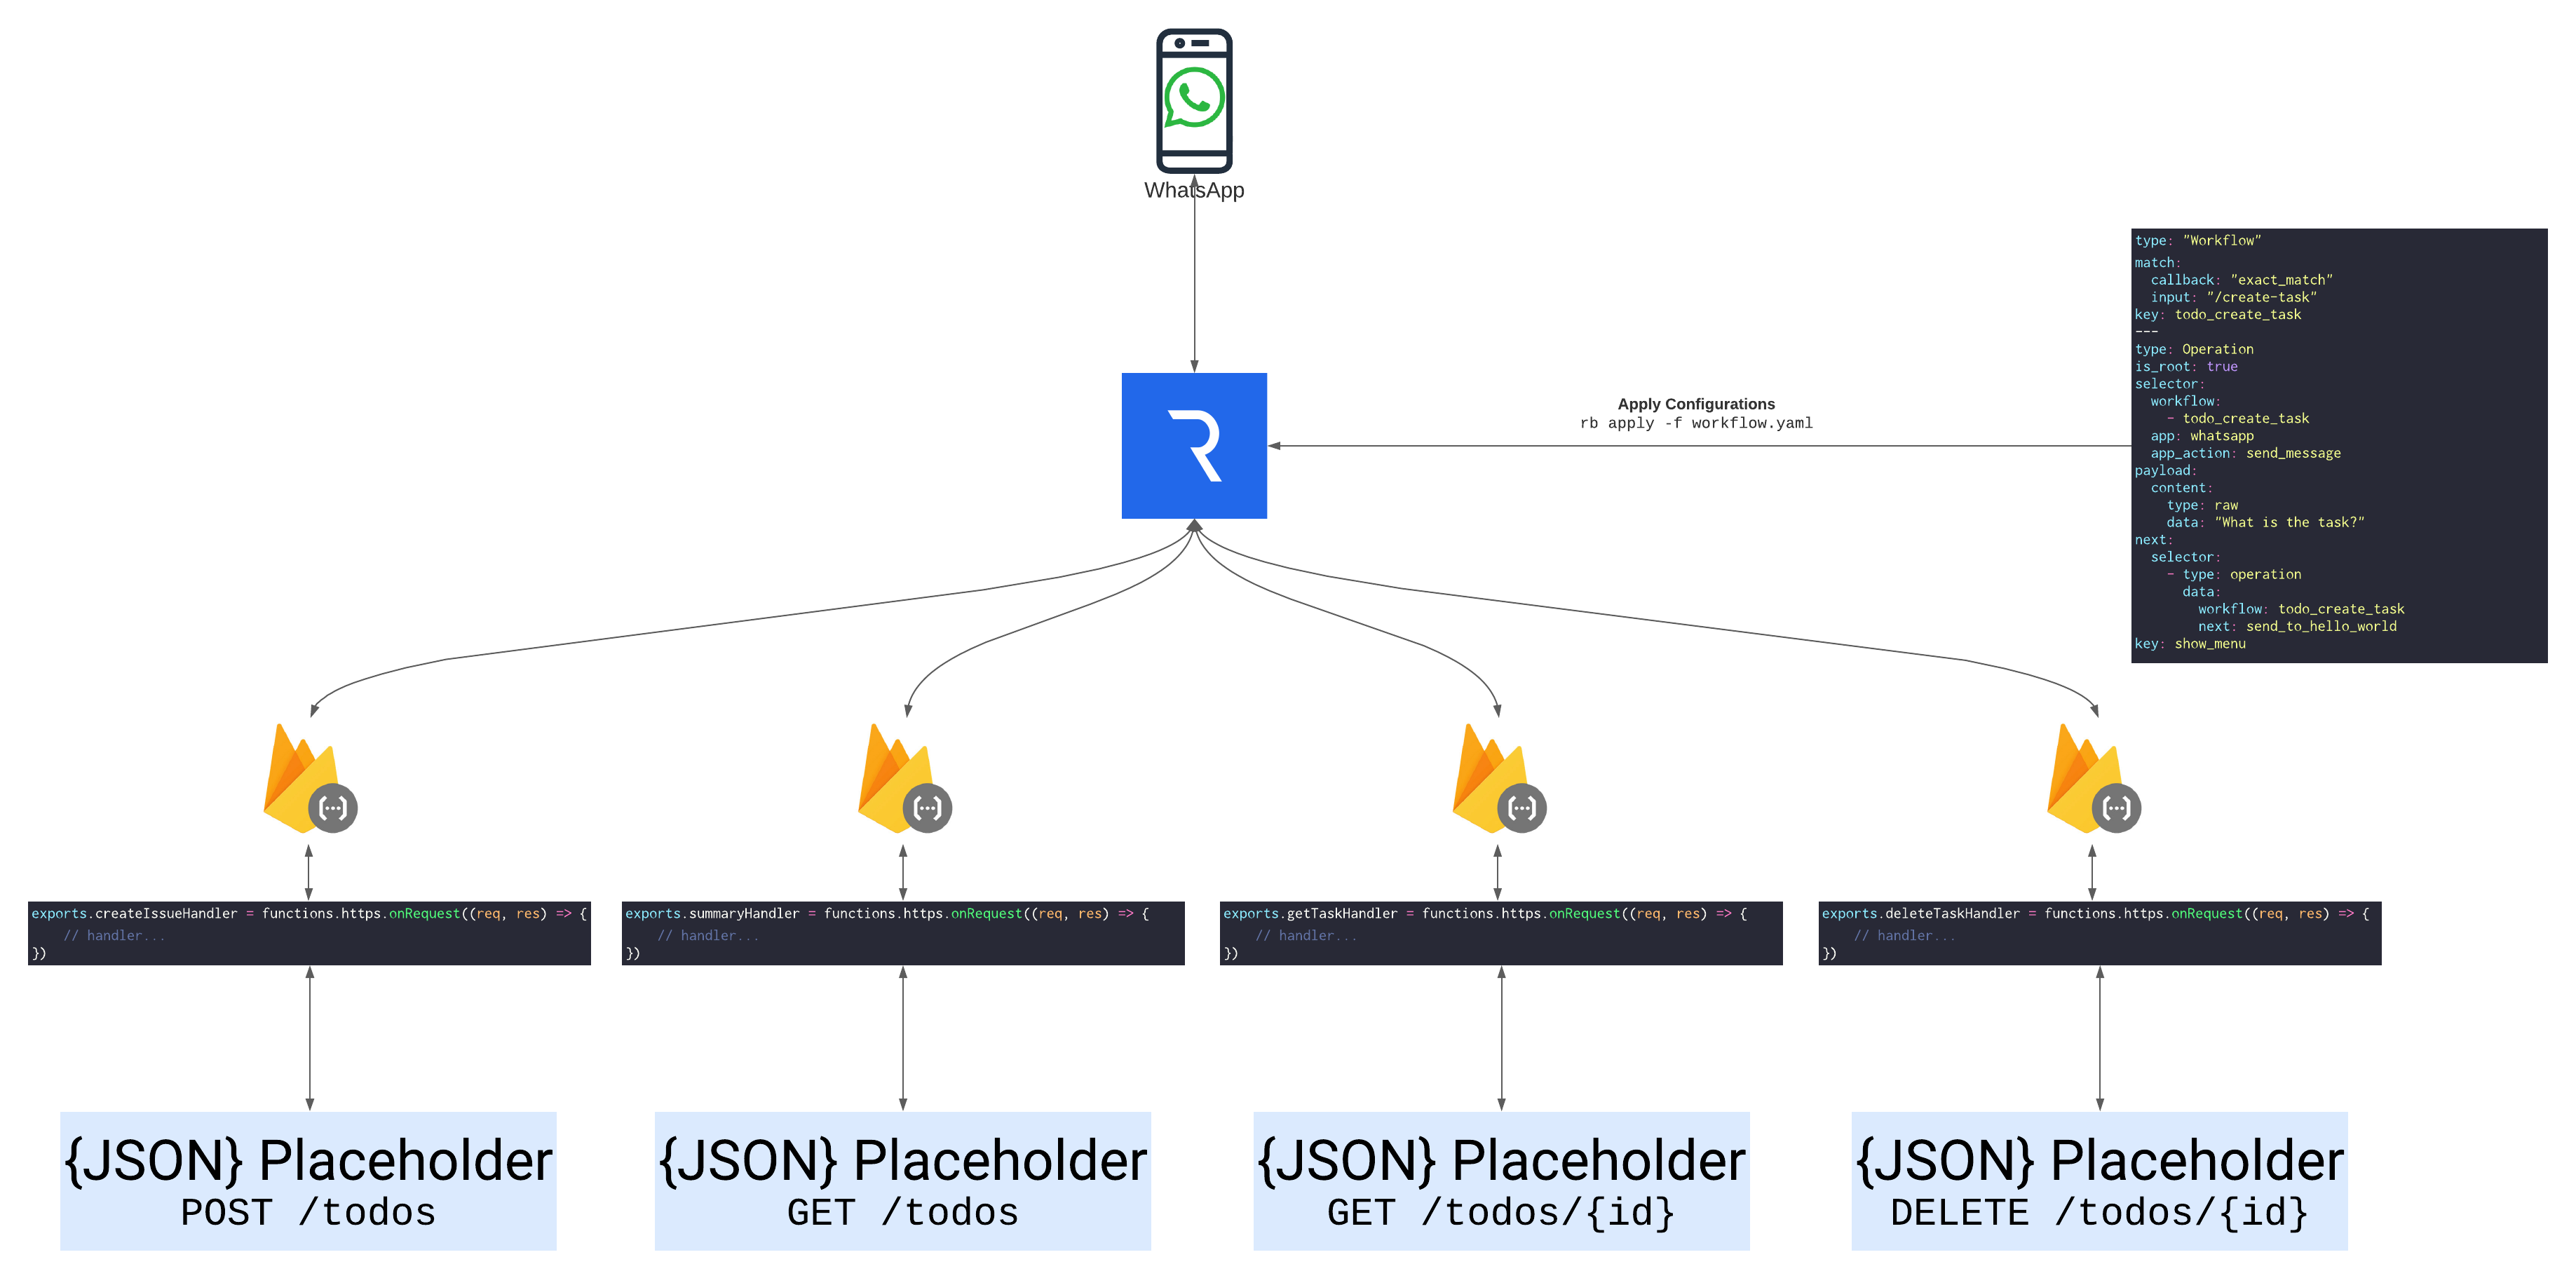
# How does it work
RELE.AI's engine runs the given workflow one operation after the other. Each operation can send a request to an external server. The response from the request will be flattened and then added to the Redis state. Since the response is stored in the state, we recommend using a controller (configuration of type App) to shape the data as needed. In the case of serverless, those controllers will be cloud functions.region('{{ GOOGLE_FUNCTIONS_REGION }}').
Example:
- The developer configured an operation to make a request to an external cloud function.
- RELE.AI's core engine processed the operation and made the request to the handler.
- The handler collected and formatted the data from a backend server before returning the response to RELE.AI's engine.
- RELE.AI's engine added the response to the session state.
# Setting up Firebase Functions
Cloud Functions for Firebase is a serverless framework that lets you automatically run backend code in response to events triggered by Firebase features and HTTPS requests. Your JavaScript or TypeScript code is stored in Google's cloud and runs in a managed environment. So there's no need to manage and scale your servers.
# Creating a Firebase project
- In the Firebase console (opens new window), click on Add project, then select or enter a Project name. If you already have an existing Google Cloud project, you can select the project from the dropdown menu to add Firebase resources to that project.
- Click Continue
- Click Create project (or Add Firebase, if you're using an existing Google Cloud Project).
TIP
Make sure the Google Cloud Project is associated with a billing account
Firebase automatically provisions resources for your Firebase project. When the process completes, you'll be taken to the overview page for your Firebase project in the Firebase console.
# Setting up Node.JS and Firebase CLI
You'll need a Node.js (opens new window) environment to write functions, and you'll need the Firebase CLI to deploy functions to the Cloud Functions runtime.
Once you have Node.js and npm installed, install the Firebase CLI (opens new window) via your preferred method. To install the CLI via npm, use:
npm install -g firebase-tools
This installs the globally available firebase command.
# Initalize your project
When you initialize Firebase SDK for Cloud Functions, you create an empty project containing dependencies and some minimal sample code, and you choose either TypeScript or JavaScript for composing functions.region('{{ GOOGLE_FUNCTIONS_REGION }}'). For the purposes of this tutorial, you'll also need to initialize Cloud Firestore.
- Run
firebase loginin your terminal to login via the browser and authenticate the firebase tool. - Go to your Firebase project directory.
- Run
firebase init firestore. For this tutorial, you can accept the default values when prompted for Firestore rules and index files. If you haven't used Cloud Firestore in this project yet, go tohttps://console.firebase.google.com/project/$YOUR-PROJECT/firestore to create your Cloud Firestore database. You'll also need to select a starting mode and location for Firestore as described in Get started with Cloud Firestore (opens new window). - Run
firebase init functions. The tool gives you an option to install dependencies with npm. It is safe to decline if you want to manage dependencies in another way, though if you do decline you'll need to runnpm installbefore emulating or deploying yourfunctions.region('{{ GOOGLE_FUNCTIONS_REGION }}').
The tool gives you two options for language support:
- JavaScript
- TypeScript. See Write Functions with TypeScript for more information.
For this tutorial, select JavaScript. After these commands complete successfully, your project structure looks like this:
myproject
 +- .firebaserc    # Hidden file that helps you quickly switch between
 |                 # projects with `firebase use`
 |
 +- firebase.json  # Describes properties for your project
 |
 +- functions/     # Directory containing all your functions code
      |
      +- .eslintrc.json  # Optional file containing rules for JavaScript linting.
      |
      +- package.json  # npm package file describing your Cloud Functions code
      |
      +- index.js      # main source file for your Cloud Functions code
      |
      +- node_modules/ # directory where your dependencies (declared in
                       # package.json) are installed
# Installing axios (opens new window) for later use
We will use axios in this example to make requests to the backend service.
To install axios in the project:
# cd into the functions directory
cd ./functions/

# install axios via npm
npm install axios
# Setting up the RELE.AI CLI
You'll need the RELE.AI CLI to deploy workflows to the RELE.AI runtime and Node.js (opens new window) to run the CLI. Once you have Node.js and npm installed, install the RELE.AI CLI via your preferred method. To install the CLI via npm, use:
npm install -g @releai/cli
# Authenticate with RELE.AI CLI
Run rb auth:login to log in via the browser and authenticate the RELE.AI tool. If you are already a registered organization, you can log in to your user before authorizing the CLI. Otherwise, you can register as a new company and authorized the CLI once you're done with the registration.
# Add a configs directory to your firebase project layout
Under the functions directory, create a new folder called configs. This directory will contain all the RELE.AI workflow configurations.
myproject
 +- .firebaserc    # Hidden file that helps you quickly switch between
 |                 # projects with `firebase use`
 |
 +- firebase.json  # Describes properties for your project
 |
 +- functions/     # Directory containing all your functions code
      |
      +- .eslintrc.json  # Optional file containing rules for JavaScript linting.
      |
      +- package.json  # npm package file describing your Cloud Functions code
      |
      +- index.js      # main source file for your Cloud Functions code
      |
      +- node_modules/ # directory where your dependencies (declared in
      |                # package.json) are installed
      +- configs/      # directory where your workflow configs
          |            # will be listed
          +- app.yaml       # the serverless application definitions
          |
          +- create-task-workflow.yaml # the create task workflow definiton
          |
          +- summary-workflow.yaml # the summary workflow definiton
          |
          +- get-task-workflow.yaml # the get task workflow definiton
          |
          +- delete-task-workflow.yaml the delete task workflow definition
# Defining the application
The application definition is an indication for RELE.AI's runtime on the base request details for the integrated service. In a serverless deploying, the definition needs to point the base URL to the cloud endpoint.
You can find the the base URL in your firebase functions console under each function:
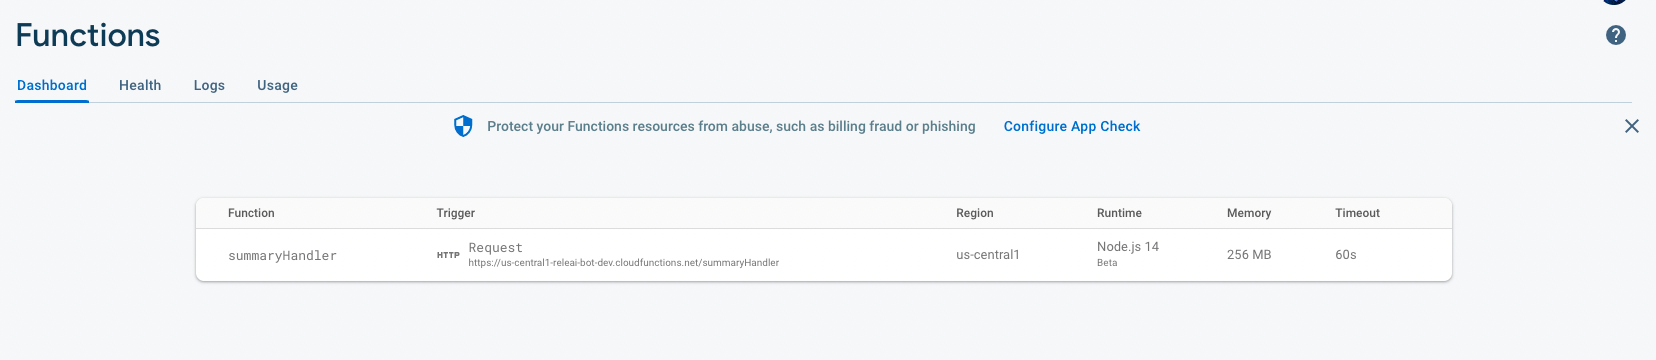
After you have the base_url of your cloud functions, create the application definition and write it to the configs directory under app.yaml
# describe the config type
type: App

# point to the app's base url
# example: https://{us-central1}-{my-new-project}.cloudfunctions.net
base_url: https://{region}-{projectId}.cloudfunctions.net

# access protocol - gRPC or REST
protocol: REST

# app config identifier
key: serverless_app
# Writing the handlers and workflows
For each workflow we will create a handler that will format the data according to our needs and a set of operations that will define the user's experience within WhatsApp.
# Create task
To define the create-task workflow we will first define the user's experience within WhatsApp:
- The user will send
/create-taskto RELE.AI's number - The bot will reply with a question about the content of the task
- The user will send the content of the task to RELE.AI's number
- RELE.AI runtime will make a request to the backend service asking to create a task
- The bot will reply with a success message
# Step 1: Creating the workflow trigger
We will start by creating the workflow trigger definition in the configs directory:
type: Workflow
match:
  callback: exact_match
  input: /create-task
key: create_task_workflow
TIP
The create task workflow, uses the exact_match method. This method detects a specific message text from the user and matches it to the provided configuraiton.
# Defining the user experience
To the define the user experience within WhatsApp we will define a set of operations that will correspond to each step of the above description.
# Step 2-3: The user will get a question from the bot asking for the task content
To send a message via the WhatsApp integration, use the whatsapp application and the send_message app_action. To read more about the WhatsApp integration, check the WhatsApp integration docs.
type: Operation

selector:
  workflow:
    - create_task_workflow
  app: whatsapp
  app_action: send_message

# the is_root attribute defines where the workflow should start
is_root: true

next:
  selector:
    - type: operation
      data:
        workflow: create_task_workflow
        next: create_task

payload:
  content:
    type: raw
    data: "What would you like the task to say?"

key: ask_the_user_for_task_content
# Step 4: RELE.AI runtime will make a request to the backend service to create the task
Once the user replied to the question, RELE.AI runtime will make a request to the serverless handler to create the task through the backend service with the provided content. We want to use the middleware handler to provide an authentication, data validation, and formatting layer between RELE.AI's runtime and the backend service.
type: Operation

selector:
  workflow:
    - create_task_workflow
  app: serverless_app
  app_action: create_task_handler

next:
  selector:
    - type: operation
      data:
        workflow: create_task_workflow
        next: send_task_id_to_user

# we will use the on_error attribute
# to handle server errors and let the user
# know what happend.
on_error:
  selector:
    - type: operation
      data:
        workflow: create_task_workflow
        next: send_error_message_to_user

payload:
  task:
    # we will grab the user's response
    # from the global redis state using the operation
    # key as a prefix to the state data
    type: redis
    rkey_type: hash_map
    data: ask_the_user_for_task_content:message_data:message:body

key: create_task
# Step 5: The bot will reply back with a success message
type: Operation

selector:
  workflow:
    - create_task_workflow
  app: whatsapp
  app_action: send_message

output:
  operation_type: drop_session

payload:
  # we will use the vars option to customize the response message with
  # the data we got from the handler
  content:
    type: raw
    data: "I've created that task for you. Your task ID is: $task_id"
    vars:
      # we will grab the task id from the global redis state
      task_id:
        type: redis
        rkey_type: hash_map
        data: create_task:id

key: send_task_id_to_user
# Handle server errors
type: Operation

selector:
  workflow:
    - create_task_workflow
    - summary_workflow
    - get_task_workflow
    - delete_task_workflow
  app: whatsapp
  app_action: send_message

output:
  operation_type: drop_session

payload:
  content:
    type: raw
    data: "Something went wrong :-("

key: send_error_message_to_user
# Writing the serverless handler
The handler will get the data from the RELE.AI's runtime, make a request to the backend service and reply back with the created task id.
const axios = require('axios')
const functions = require('firebase-functions')

exports.createTaskHandler = functions
	.region('{{ GOOGLE_FUNCTIONS_REGION }}')
	.https
	.onRequest(async (req, res) => {
		// make a request to the backend service
		const response = await axios.post('https://jsonplaceholder.typicode.com/todos', {
			title: req.body.task,
			userId: 1,
			completed: false,
		})

		// format the provided response to our needs
		res.json({
			id: response.data.id
		})
	})
In addition to the handler we will need to provide RELE.AI with an app_action configuration to make the handler accessible through RELE.AI.
type: AppAction
selector:
  app: serverless_app
request:
  method: POST
  uri: /createTaskHandler
key: create_task_handler
⚙️ Automation
Remember you can always automate the app_action generation using a build script.
🛡️ Security
It is recommended to pass some access token to add another validation layer to the request.
# Summary
To define the summary workflow we will first define the user's experience within WhatsApp:
- The user will send
/summaryto RELE.AI's number - RELE.AI's runtime will collect all the information from the backend service
- The bot will reply with the content of the summary.
# Step 1: Creating the workflow trigger
We will start by creating the workflow trigger definition in the configs directory:
type: Workflow
match:
  callback: exact_match
  input: /summary
key: summary_workflow
TIP
The summary workflow, uses the exact_match method. This method detects a specific message text from the user and matches it to the provided configuraiton.
# Defining the user experience
To the define the user experience within WhatsApp we will define a set of operations that will correspond to each step of the above description.
# Step 2: RELE.AI runtime will make a request to the backend service to get a summary of the tasks
RELE.AI's runtime will request the serverless handler to collect all the summary information. Then, the handler will get the back-end service data, do some calculations, and send back a formated response.
type: Operation

is_root: true

selector:
  workflow:
    - summary_workflow
  app: serverless_app
  app_action: summary_handler

next:
  selector:
    - type: operation
      data:
        workflow: summary_workflow
        next: send_summary

# we will use the on_error attribute
# to handle server errors and let the user
# know what happend.
#
# NOTE: We will be using the same error message
# operation from the last endpoint.
on_error:
  selector:
    - type: operation
      data:
        workflow: summary_workflow
        next: send_error_message_to_user

key: collect_summary
# Step 3: The bot will reply back with the summary
type: Operation

selector:
  workflow:
    - summary_workflow
  app: whatsapp
  app_action: send_message

output:
  operation_type: drop_session

payload:
  # we will use the vars option to customize the response message with
  # the data we got from the handler
  content:
    type: redis
    data: collect_summary:text

key: send_summary
# Writing the serverless handler
The handler will get the data from the RELE.AI's runtime, make a request to the backend service and reply back with the tasks summary.
const axios = require('axios')
const functions = require('firebase-functions')

function getSummaryData(tasks) {
	let summaryData = {
		userIds: new Set(),
		taskIds: new Set(),
		completedTasks: 0,
	}

	// for each task collect the relevant information
	for (const task of tasks) {
		// append the user id
		summaryData.userIds.add(task.userId)

		// append the task id
		summaryData.taskIds.add(task.id)

		// increase count if task is completed
		if (task.completed) {
			summaryData.completedTasks++
		}
	}

	return {
		...summaryData,
		usersCount: summaryData.userIds.size,
		tasksCount: summaryData.taskIds.size,
	}
}

exports.summaryHandler = functions
	.region('{{ GOOGLE_FUNCTIONS_REGION }}')
	.https
	.onRequest(async (req, res) => {
		// make a request to the backend service
		const response = await axios.get('https://jsonplaceholder.typicode.com/todos')

		// calculate summary informaiton and format data
		const summaryData = getSummaryData(response.data)

		// format the provided response to our needs
		res.json({
			text: `
			Here's a summary of your tasks:\n
			• ${summaryData.usersCount} users created tasks in the system.\n
			• ${summaryData.tasksCount} tasks are stored in the system.\n
			• ${summaryData.completedTasks} are completed tasks.
			`
		})
	})
In addition to the handler we will need to provide RELE.AI with an app_action configuration to make the handler accessible through RELE.AI.
type: AppAction
selector:
  app: serverless_app
request:
  method: GET
  uri: /summaryHandler
key: summary_handler
# Get task
To define the get-task workflow we will first define the user's experience within WhatsApp:
- The user will send
/get-taskto RELE.AI's number - The bot will request the task ID.
- The user will send the task ID to RELE.AI's number
- RELE.AI runtime will query the backend service for the task
- The bot will reply with the task
# Step 1: Creating the workflow trigger
We will start by creating the workflow trigger definition in the configs directory:
type: Workflow
match:
  callback: exact_match
  input: /get-task
key: get_task_workflow
# Defining the user experience
To the define the user experience within WhatsApp we will define a set of operations that will correspond to each step of the above description.
# Step 2-3: The bot will ask the user for the task ID
To send a message via the WhatsApp integration, use the whatsapp application and the send_message app_action. To read more about the WhatsApp integration, check the WhatsApp integration docs.
type: Operation

selector:
  workflow:
    - get_task_workflow
  app: whatsapp
  app_action: send_message

# the is_root attribute defines where the workflow should start
is_root: true

next:
  selector:
    - type: operation
      data:
        workflow: get_task_workflow
        next: query_task

payload:
  content:
    type: raw
    data: "What is the task ID you're looking for?"

key: ask_the_user_for_task_id
# Step 4: RELE.AI runtime will query the backend service for the task
Once the user replied to the question, RELE.AI runtime will make a request to the serverless handler to get the task through the backend service with the provided id.
type: Operation

selector:
  workflow:
    - get_task_workflow
  app: serverless_app
  app_action: get_task_handler

next:
  selector:
    - type: operation
      data:
        workflow: get_task_workflow
        next: send_task_to_user

# we will use the on_error attribute
# to handle server errors and let the user
# know what happend.
on_error:
  selector:
    - type: operation
      data:
        workflow: get_task_workflow
        next: send_error_message_to_user

payload:
  id:
    # we will grab the user's response
    # from the global redis state using the operation
    # key as a prefix to the state data
    type: redis
    rkey_type: hash_map
    data: ask_the_user_for_task_id:message_data:message:body

key: query_task
# Step 5: The bot will reply back with the task details
type: Operation

selector:
  workflow:
    - get_task_workflow
  app: whatsapp
  app_action: send_message

output:
  operation_type: drop_session

payload:
  # we will use the vars option to customize the response message with
  # the data we got from the handler
  content:
    type: redis
    data: query_task:text

key: send_task_to_user
# Writing the serverless handler
The handler will get the data from the RELE.AI's runtime, make a request to the backend service and reply back with the task details.
const axios = require('axios')
const functions = require('firebase-functions')

exports.getTaskHandler = functions
	.region('{{ GOOGLE_FUNCTIONS_REGION }}')
	.https
	.onRequest(async (req, res) => {
		// make a request to the backend service
		const response = await axios.get(`https://jsonplaceholder.typicode.com/todos/${req.query.id}`)

		// format the provided response to our needs
		res.json({
			text: `
			*title:* ${response.data.title}\n
			*completed:* ${response.data.completed ? 'Yes' : 'No'}
			`
		})
	})
In addition to the handler we will need to provide RELE.AI with an app_action configuration to make the handler accessible through RELE.AI.
type: AppAction
selector:
  app: serverless_app
request:
  method: GET
  uri: /getTaskHandler
key: get_task_handler
# Delete task
To define the delete-task workflow we will first define the user's experience within WhatsApp:
- The user will send
/delete-taskto RELE.AI's number - The bot will request the task ID.
- The user will send the task ID to RELE.AI's number
- RELE.AI runtime will delete the task via the backend service
- The bot will reply with a success message
# Step 1: Creating the workflow trigger
We will start by creating the workflow trigger definition in the configs directory:
type: Workflow
match:
  callback: exact_match
  input: /delete-task
key: delete_task_workflow
# Defining the user experience
To the define the user experience within WhatsApp we will define a set of operations that will correspond to each step of the above description.
# Step 2-3: The bot will ask the user for the task ID
To send a message via the WhatsApp integration, use the whatsapp application and the send_message app_action. To read more about the WhatsApp integration, check the WhatsApp integration docs.
type: Operation

selector:
  workflow:
    - delete_task_workflow
  app: whatsapp
  app_action: send_message

# the is_root attribute defines where the workflow should start
is_root: true

next:
  selector:
    - type: operation
      data:
        workflow: delete_task_workflow
        next: delete_task

payload:
  content:
    type: raw
    data: "What is the task ID you want to delete?"

key: ask_the_user_for_task_id_delete
# Step 4: RELE.AI runtime will delete the task via the backend service
Once the user replied to the question, RELE.AI runtime will make a request to the serverless handler to delete the task through the backend service with the provided id.
type: Operation

selector:
  workflow:
    - delete_task_workflow
  app: serverless_app
  app_action: delete_task_handler

next:
  selector:
    - type: operation
      data:
        workflow: delete_task_workflow
        next: send_delete_success_message

# we will use the on_error attribute
# to handle server errors and let the user
# know what happend.
on_error:
  selector:
    - type: operation
      data:
        workflow: delete_task_workflow
        next: send_error_message_to_user

payload:
  id:
    # we will grab the user's response
    # from the global redis state using the operation
    # key as a prefix to the state data
    type: redis
    rkey_type: hash_map
    data: ask_the_user_for_task_id_delete:message_data:message:body

key: delete_task
# Step 5: The bot will reply back with a success message
type: Operation

selector:
  workflow:
    - delete_task_workflow
  app: whatsapp
  app_action: send_message

output:
  operation_type: drop_session

payload:
  # we will use the vars option to customize the response message with
  # the data we got from the handler
  content:
    type: raw
    data: The task has been deleted

key: send_delete_success_message
# Writing the serverless handler
The handler will get the data from the RELE.AI's runtime, make a request to the backend service to delete the task.
const axios = require('axios')
const functions = require('firebase-functions')

exports.deleteTaskHandler = functions
	.region('{{ GOOGLE_FUNCTIONS_REGION }}')
	.https
	.onRequest(async (req, res) => {
		// make a request to the backend service
		const response = await axios.delete(`https://jsonplaceholder.typicode.com/todos/${req.query.id}`)

		// format the provided response to our needs
		res.json({})
	})
In addition to the handler we will need to provide RELE.AI with an app_action configuration to make the handler accessible through RELE.AI.
type: AppAction
selector:
  app: serverless_app
request:
  method: DELETE
  uri: /deleteTaskHandler
key: delete_task_handler
# Deployment
To apply & deploy configurations please run:
npm run deploy
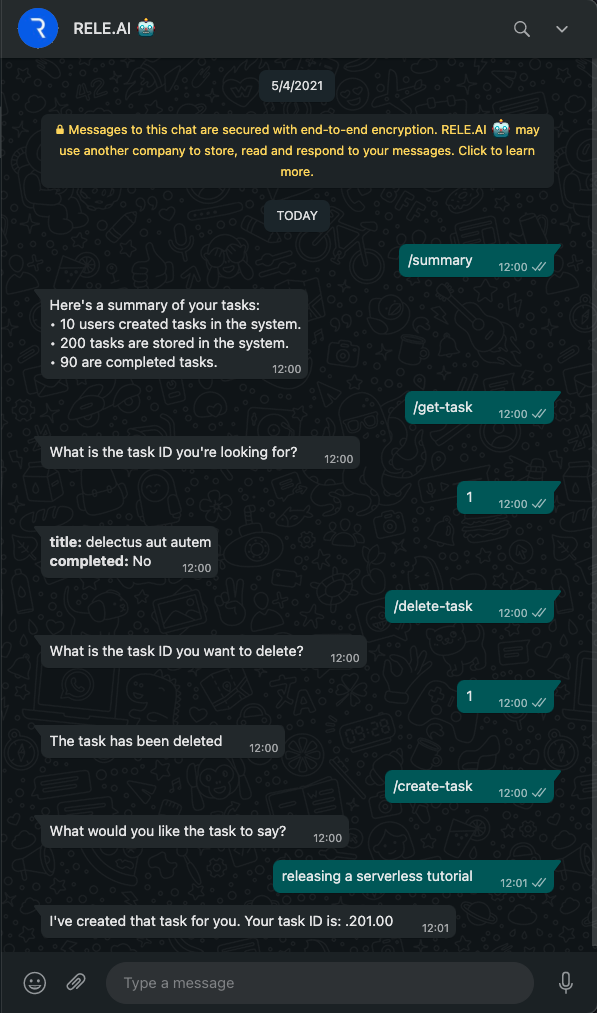
# Using the integration
Below is a screenshot from WhatsApp on how to use each workflow:
# Clean up
To delete the cloud functions and to remove the workflows from your environment, run the following command:
npm run cleanup